Saturday, February 9, 2013

Well Cuddle Me Happy!

Cuddle by Shannon is the most irresistible fabric I have 
ever had my hands on! 
So that is why I have chosen it to go with my Celebrate Suess! fabric from Robert Kaufman.
Now all I need to do is decide on a pattern and I'll be set!

Plus, since Cuddle by Shannon is 60 inches wide I won't have to do any piecing for the back of my quilt!

It's The Perfect Back for a Baby Quilt!


Shannon Fabrics and Robert Kaufman have joined forces to create the most beautifully soft and cuddly fabric imaginable. Just look at the cotton and the cuddle together!

This quilt is going to be fabulous!


Tuesday, February 5, 2013

The Journey of the Trip Around the World Quilt: The Journey Begins

So the story goes...

One beautiful quilting day, two best friends set off for the local quilt shop together looking for a project.  Low and behold the quilt shop was full of patterns, kits, and fabric that would dazzle and delight. Together, they wandered through the shop oohing and ahhing as they went. 

Then suddenly there it was. A gorgeous quilted masterpiece, made from hundreds of tiny, 30's print, squares. Their jaws dropped, their hearts leapt, and their eyes grew glassy as they pictured the joy that this quilt would bring. 

They were assured by the lovely shop worker that the quilt would be easy to create. She herself had made the sample and it would be a "piece of cake" if they did it together. Inspired both friends bought their own kit. 

They took it home...
They opened it up...
They admired all of the beautiful fabrics...
They read the pattern...and they put it away.

That's it. They put it away. That is the end of our story.


Or so you might think... 

One beautiful quilting day, almost a decade later, those same two best friends pulled those same two kits out of the closet and began working.

This is the journey of the Trip Around the World quilt. 


I, Sarah Beth, am the oldest daughter of these two best friends. I have grown up admiring these two beautiful woman and have learned so much from them. These kits were purchased when I was 15 years old and I now have the privilege of telling their story, and witnessing their transformation into masterpieces. I'm sure there will be pit stops and detours along the way, but I also know that these two woman are capable of anything they set their mind to.

So I invite you to join me on a trip of determination, skill and friendship. Let the journey begin!


Friday, February 1, 2013

I Feel a Project Coming On!

Look what arrived in the mail today! 


I feel a new project coming on...and it's going to be FABULOUS!
Stay tuned for more...


Thursday, January 24, 2013

Yo Yo Baby Socks

I absolutely LOVE the Clover "Quick" Templates!
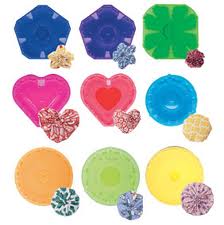
They have so many shapes and sizes to choose from and they make sewing the shapes a breeze. Here are some examples of the templates and what shapes they make.


Lately I've been adding them to baby socks! 
They make super cute accents and are simple to make!
These yo yos were made using the extra small blue yo yo maker and the small green yo yo maker.


Which Clover template is your favorite?


Sunday, January 13, 2013

Immensely Easy Infinity Scarf Tutorial

Here's a scarf that can keep you warm and fashionable 
at the same time!

Infinity scarves are fun, fashionable and easy to make. Plus, with all the different colors, prints, and textures of fabrics, the possibilities are endless!


Here's how to make one!


1. Start with 5/8 yard of a 60 inch wide fabric. I prefer fabrics with a stretchy quality. For this tutorial I used a swim/dance knit fabric.

2. Fold right sides together long ways and sew a 1/2 inch seam. Leave 2-3 inches unsewn at both ends. Backstitch at the beginning and end of your seam to reinforce stitches.

3. Pull the scarf through itself so that it is now right side out.

4. Lay scarf horizontally with seam at top and fold one end upward at a 90 degree angle.

5. Now bring the vertical folded area down, behind the horizontal part. This forms a nice twist in the scarf to give it bounce.

6. Bring the open ends together. Match inside edges right sides together.

7. Sew seam all the way around, making sure to backstitch at beginning and end.

8. Flip raw edges inside opening and hand stitch opening closed with your favorite invisible stitch.

9. Wear and enjoy!


I hope you enjoyed my little tutorial. 
Infinity scarves are so fun to make! They are also great accessories and gifts!


If you have any questions about my directions please let me know.
I'd also love to see pictures of the creations you come up with!

Wednesday, January 9, 2013

Fabulous Flannel Happy Quilt

Happy New Year Friends!

I can't believe it's already January 9th and I haven't shared anything with you. YIKES!

So here we go...
This year I decided to make a resolution I could actually stick to and I'm already done!!! Go Me!

As you know, I believe in "happy fabric". Fabric that makes you happy when you look at it! 
I already had a cotton Happy Fabric quilt that I created a few years back using the Turning Twenty pattern by Tricia Cribbs of FriendFolks.


NOW I needed to finish my FLANNEL Happy Fabric quilt! 
(That's where the resolution part comes in.)

I had already purchased the flannel prints by Robert Kaufman, cut the fabric, and pieced the
 entire front. It was just sitting, lonely, with a few other UFOs.

Resolution Accepted!

Over my Christmas break I batted, backed, quilted, and bound my beautiful FLANNEL Happy Quilt!
The pattern is from the book Happy Hour by Atkinson Designs.

What do you think?
Funky Front
Pieced Back


My hubby definitely likes it!!!


Sunday, December 30, 2012

Cozy Cuddle Scarf

Winter always gets me in a scarf making mood! Here's my newest scarf creation. A scarf made from Mar Bella Cuddle by Shannon Fabrics.


1. Start with a 1/2 yard of your favorite Cuddle by Shannon.

2. With right sides together, sew the entire length of the fabric.


3. Move the seam to the center of the back of the scarf and sew the end closed. Sew the seam open to eliminate bulk.

4. Repeat step 3 on the other end, leaving a small opening to turn the scarf through. Back stitch to reinforce the opening.

5. Pull scarf through opening to that it's right side out.


6. Whip stitch opening closed or top stitch to catch opening.

7. Wear and enjoy!!!